Wednesday, 16 October 2013

Salted Caramel Double Chocolate Muffins

Salted caramel double chocolate muffins...jheeze that's a big name for muffins ay. But I promise you they do taste as good as they sound.


Salted Caramel is supposed to be 'fashionable' at the moment in the world of food right so I thought hay why not give it a whirl and adapt a regular chocolate muffin recipe to make it into a salted caramel double chocolate muffin recipe. Which in my opinion sounds ten times better anyway.


You can never have too much chocolate right? I have found that chopping the chocolate up into chunks tastes soooo much better than just buying chocolate buttons!

Salted Caramel Double Chocolate Muffins:
*Disclaimer: This is not my own recipe it has been adapted from the Hummingbird Bakeries chocolate muffins*
Ingredients:
200g Caster Sugar
130g Plain Flour
50g Cocoa Powder
2tsp Baking Powder
1tsp Salt
160ml Whole Milk
1tsp Vanilla Extract
170g Butter (Melted)
120g Dark Chocolate (Roughly Chopped)
4 bars of caramel chocolate (I used Cadbury bars)


Method:
1.Preheat the oven to 170C, 325F or gas mark 3.
2. Put the eggs and sugar in a bowl and whisk until pale and well combined.
3.In a separate bowl sift together the flour, cocoa, baking powder and salt. In another bowl, combine the milk and vanilla extract.
4.Gradually beat these two mixtures together alternately into the egg mixture little by little. Beat until all the ingredients are well combined.
5. Stir in the melted butter with a wooden spoon until well incorporated then stir in the chopped dark chocolate.
6. Spoon the mixture till the muffin cases are half way full. Add 2-3 squares of caramel chocolate on top of each muffin. Then add a little more mixture on top till the caramel chocolate is just covered and place any leftover caramel chocolate on top of the muffins.
7. Bake in the preheated oven for 30 minutes (it took mine more like 50 minutes) until the muffins bounce back when touched.
8. Sprinkle with the salt and leave to cool for a bit. These muffins are best enjoyed warm.

These muffins are so gooey and best enjoyed warm whilst the caramel and chocolate pieces are still melted and scrummy. However, you can heat them up if you don't eat them till after cooled and they will be just as scrummy.


Sunday, 15 September 2013

Striped Birthday Cake


Birthday cakes, what flavour? how should it be iced? those are among the many questions you ask yourself when deciding on a birthday cake to make. And as it was my Mum's birthday I thought why not combine the two; chocolate and vanilla to make Lorraine Pascales zebra cake.


Although it takes a while to put the vanilla and chocolate mixture together in the tin it is well worth it and actually quite relaxing!


One thing that I would like to point out is that the cake I made has 2 layers to it so I had to double the ingredients. Yes, that's a lot of eggs! (8)

Zebra Cake:
*Disclaimer this is not my own recipe, it has been adapted from Lorraine Pascale's recipe*
Ingredients:
250ml Sunflower oil (Plus extra for greasing)
100ml Milk
4 Medium eggs
A few drops of vanilla extract
300g Self raising flour
1tsp Baking powder
25g Cocoa Powder
TIP: The recipe does say to add the zest of one orange to the chocolate mixture but we didn't have any in the house so I didn't use it, however I would definitely recommend it.

Method:
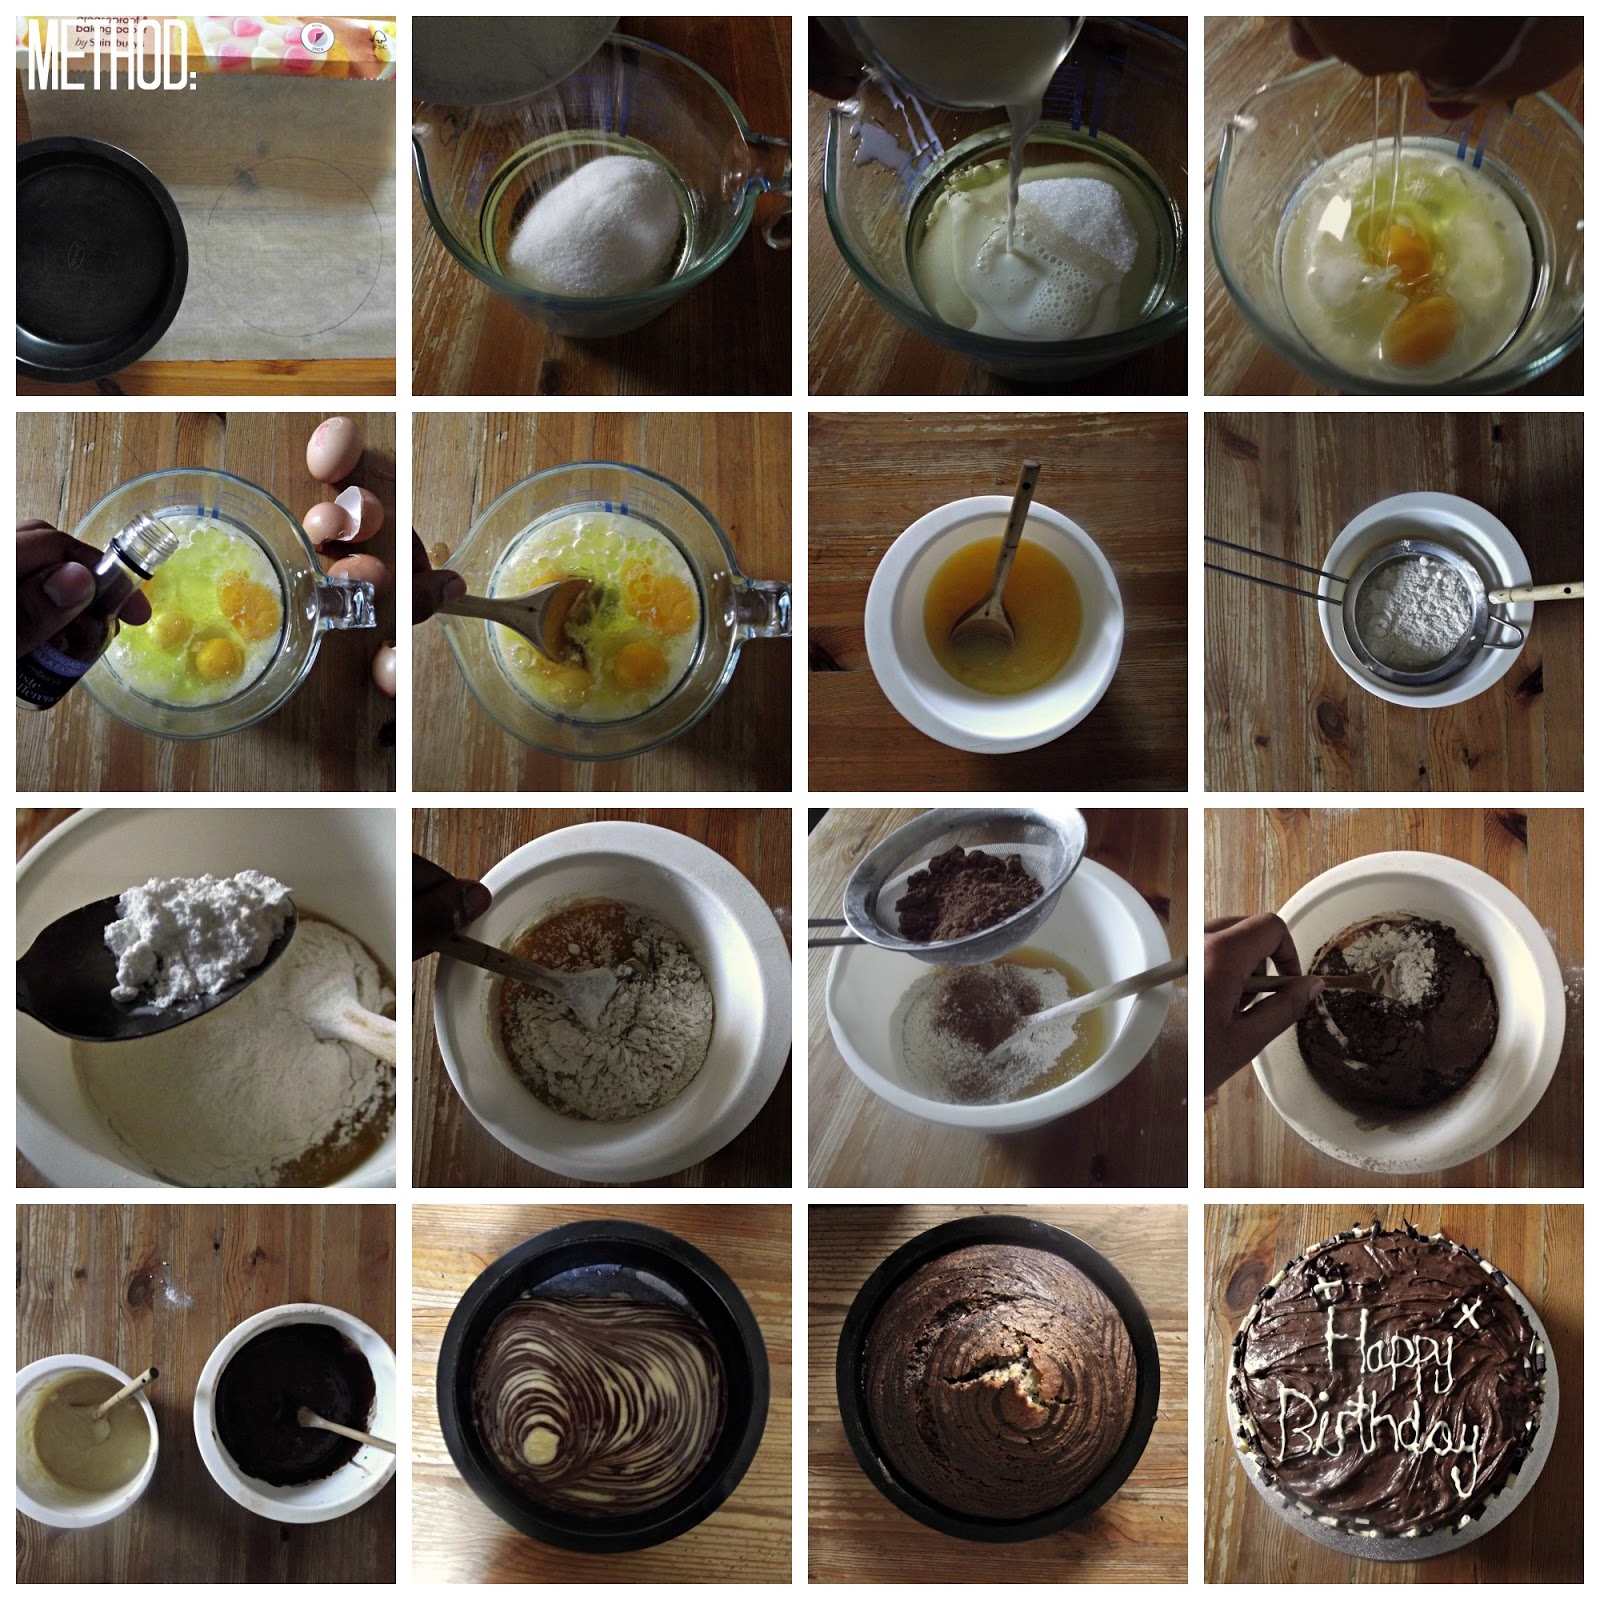
1. Preheat the oven to 180 degrees Celsius, 350 degrees Fahrenheit, gas mark 4 and line a round tin with some baking parchment and a little sunflower oil.
2. Put the oil, sugar, milk, eggs and vanilla extract together and beat with a fork until well combined.
3. Pour half the mixture (400ml/400g) into one bowl and the other half into another bowl.
4. Sift 175g of self raising flour and half a teaspoon of the baking powder into one of the bowls. Mix till well combined. This is the vanilla mixture (I added a little extra vanilla extract as well.)
5. Sift the remaining 125g of self raising flour, half a teaspoon of the baking powder and the cocoa powder. Mix till well combined. This is the chocolate mixture.
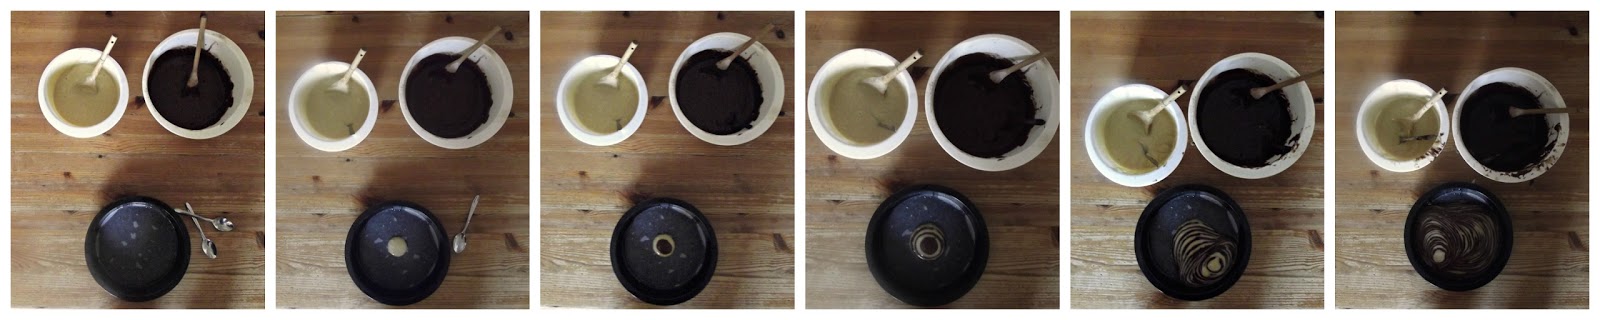
6. Put a tablespoon of the vanilla mixture into the center of greased and lined baking tin then using another tablespoon add a tablespoon of the chocolate mixture to the center of the vanilla blob. Repeat this until the mixture just touches the edge of the tin. Don't be surprised if the center moves around the tin. 
TIP: Don't use a teaspoon I did this for the first cake layer and the stripes were too thin and didn't appear very clearly so use a tablespoon.
8. Bake in the oven for 45 minutes.
9. Check if its cooked by inserting a skewer into the center of the cake. If it is remove and leave to cool if not continue to cook it for however long necessary.
10. Ice the cake or leave it plain and enjoy.


For the icing I used the hummingbird chocolate cream cheese icing for both the filling and the topping and once again I doubled it. For the top I just used melted dark and white chocolate.
Icing Recipe:
*Disclaimer, this recipe is not my own it is adapted from the hummingbird bakery*
Ingredients:
300g Icing sugar
50g Butter
125g Cream cheese
25g Cocoa Powder
Method:
1. Beat the icing sugar, cocoa powder and butter using an electric mixer until well combined.
2. Add the cream cheese and continue to beat for at least 5 minutes until well combined. Do not over beat.


You can make this cake for any occasion and I assure you it will be a success! And no one needs to know that it isn't that hard to make the strips!


Mmmm!